You know, making stuff is fun. And as I found out when I wrote the 21 Simple Ways to Be Healthy gallery, it’s good for you too!
So you can imagine my disappointment when I went Sunday morning to the fabric store all excited to solve my Thanksgiving tablecloth problem, only to discover that all the fabrics that comes on spools wider than 54 inches are meant for quilt backings…and they’re very thin and just not tablecloth-y. I just wasn’t into the idea of concocting some seam-scheme where I’d sew two pieces of “regular” cloth together to make my 84×117-inch cover, so I decided to just go online and find a purveyor of extra-large tablecloths. Expensive (gulp!), but all I really need is one for the next 4 decades or so. Done and done.
But I wasn’t about to leave the fabric store inspiration-less, not when I was in a craft-y, create-y mood! I remembered a Thanksgiving craft I’d seen online where a DIY expert made lovely place cards out of fabric. So I picked out two fabrics, bought a half-yard each (inexpensive, and I had a LOT left over), and went home to a fun, crafty Sunday. Here’s the how-to.
Thanksgiving Craft: Fabric Leaf Place Cards
(adapted from http://cathiefilian.blogspot.com)
Makes 8 place cards, with leftover fabric and backing
You will need:
— 1/2 yard each of 2 complementary fabrics
— 3/4 yard of iron-on fabric backing (I used Pellon CraftFuse)
— Iron
— Small hole punch (I used a 1/8″ punch)
— Small eyelets (you can find them in the scrapbooking aisle of a craft store) — Eyelet setting tool (ditto – scrapbooking aisle–picture at right)
— Hammer
— Sharp scissors
— Fabric-safe marker
— Leaf template (I printed out Cathie’s and blew it up to 200%)
— Thin ribbon
Let’s craft!
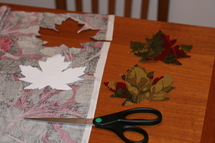
1. Cut out the small and large leaf templates in the desired size.
2. Fold the fabric over itself so that it’s doubled-over and the wrong side is facing up.
3. Trace 4 each of the small and large leaf templates onto their respective fabrics. I used a regular ballpoint pen for this, you can use a fabric pencil if you have one.
4. Cut out leaves, being careful to keep the 2 pieces of fabric together. (Alternative method for the less-lazy-than-I: simply trace and cut out 8 leaves individually….)
5. Trace and cut out 8 each of the small and leaves from the iron-on backing. Trace onto the glue (shiny) side of the fabric. I doubled the backing over itself as with the fabric so I only had to cut 4 each.
6. Lay the wrong side of the fabric leaves against the glue side of
the backing. Using a hot, dry iron, press with a firm gliding motion
until the glue has fused to the fabric. This will only take a few
seconds.
7. Trim any excess backing that’s showing on the right side of the fabric.
8.
Lay a small leaf on top of a large leaf. Holding the two leaves
together, punch a hole through both. I went toward the tips, Cathie went at the base. I don’t know why, but somehow that looked upside-down to me. Choose your own layout!
9.
Insert an eyelet so that its narrow tube side is poking through the
wrong side of the place card. Hold the eyelet setting tool against the
eyelet, bash it a few times with the hammer until it’s flattened and
set.
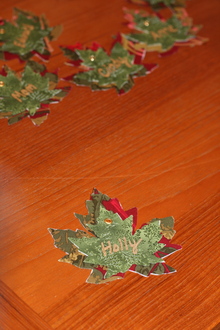
10. Use the fabric marker to write the person’s name on the card.
The
possibilities for how to set up the place card are endless. They’re
stiff enough to lean up against a wine glass. Or you can hang them
from a chandelier like festive ornaments. Or you can rest a swizzle
stick in a glass and tie the card to the stick. Or you can tie them to
the backs of your chairs. Or you can eyelet in a piece of paper with
the person’s name on it. Or you can tie a loop around your napkins, or
draped over your napkin ring. Or….?
Do you have favorite Thanksgiving crafts to share?
Like what you see? Click here to subscribe and get Fresh Living in your in-box every day!


